If you’re searching “bird protector 8 in 1 how to use,” the safest answer is simple: use it only as the label directs, and don’t put it on your bird. This product is meant to sit in or on the cage area, not on feathers, skin, food, or water. That distinction matters because birds are sensitive to fumes, residues, and accidental chewing.
8 in 1 UltraCare Bird Protector is marketed as a cage-based mite and lice control product for pet birds. As of 2026, the safest guidance is still label-first use, careful placement, and close monitoring after setup. The U.S.
Environmental Protection Agency treats pesticide label directions as enforceable use instructions, so the label is not optional reading.
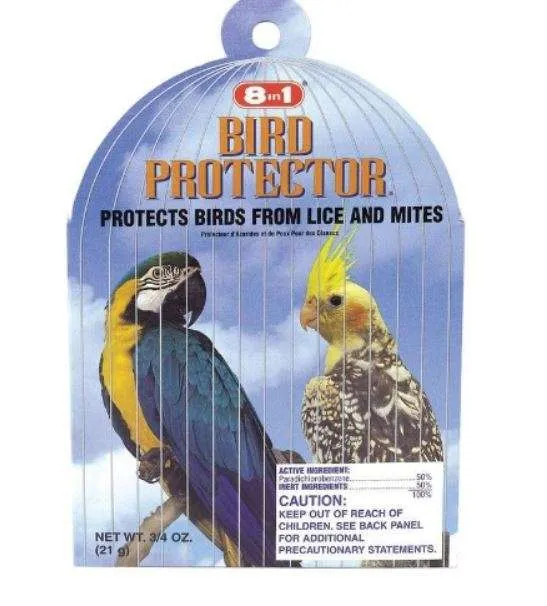
Image source: Web (Bing) / animalgardenbda.com (Web image (fair-use with source credit))
Quick Answer
For bird protector 8 in 1 how to use, read the label first. Hang it on the cage as directed. Keep it away from food and water.
Don’t let your bird chew it. Remove it if your bird seems distressed.
What 8 in 1 Bird Protector Is, and What It Isn’t
8 in 1 Bird Protector is a cage-based parasite control product. It’s made to help control mites and lice around a bird’s living space.
It is not a medicine you rub on your bird. It is not a spray for feathers. It is not a substitute for an avian vet exam.
That matters because scratching and feather loss have many possible causes. Mites are one possibility. So are molting, dry air, stress, poor diet, skin infection, feather picking, and other health problems.
Here’s the practical difference:
| What it is | What it is not |
|---|---|
| A cage-hanging protector | A direct skin treatment |
| A mite and lice control aid | A cure for all feather loss |
| A label-directed product | Something to use extra for faster results |
| A support tool for cage hygiene | A replacement for veterinary care |
If you also care for outdoor birds, keep those routines separate from indoor cage care. Choosing safe backyard foods is a different job from managing parasites in a pet bird cage.
The big rule is simple. Treat the cage environment carefully, then watch the bird. If symptoms continue, you need more than a cage setup fix.
Before You Use It: Check Your Bird, Cage, and Product Label
Before opening the package, read the full product label. Look for the active ingredient, bird type, cage size guidance, replacement timing, and warnings.
Image source: Web (Bing) / avianbliss.com (Web image (fair-use with source credit))
The label matters because pesticide-style products are controlled by directions, not guesswork. In the United States, the U.S. Environmental Protection Agency explains that pesticide labels include required directions for safe and lawful use.
Do a quick bird check before using it:
- Is your bird breathing normally?
- Is it eating and drinking?
- Is it alert and steady on the perch?
- Is there heavy feather loss, bleeding, swelling, or crusty skin?
- Is the bird very young, elderly, weak, or already sick?
If any answer worries you, call an avian vet before using the product. Small birds can react quickly to chemicals and poor airflow.
Now check the cage. The protector should never sit where your bird can chew it, shred it, or drop it into water. Keep it away from seed cups, fresh food, grit, mineral blocks, and bathing dishes.
If your bird spends time near open windows or outdoor aviary areas, parasite exposure can be higher. Homes with active wild bird feeding spots need extra care too. That doesn’t mean stronger treatment is better.
It means cleaner routines and closer observation matter more.
Step-by-Step: How to Place 8 in 1 Bird Protector in the Cage
Use 8 in 1 Bird Protector by placing it in the cage exactly where the package directions say. The goal is controlled exposure to the cage area, not direct contact with your bird.
Image source: Web (Bing) / walmart.com (Web image (fair-use with source credit))
Follow this safe setup flow:
- Read the label from start to finish. Don’t rely on memory or old online directions.
- Clean the cage first. Remove droppings, old food, loose feathers, and nesting debris.
- Wash dishes and perches. Let them dry before everything goes back.
- Open the package carefully. Keep the product in its holder if the design requires it.
- Attach it to the cage. Choose a spot your bird cannot chew or peck.
- Keep it away from food and water. Avoid seed cups, water bowls, and bath areas.
- Watch your bird closely. Check behavior during the first few hours.
Use this quick placement guide:
| Cage area | Good choice? | Why |
|---|---|---|
| Near food bowl | No | Risk of contamination |
| Near water dish | No | Risk of residue or soaking |
| Low corner with droppings | No | Poor hygiene |
| Outside beak reach | Yes | Reduces chewing risk |
| Well-ventilated cage area | Yes | Helps limit fume buildup |
Don’t add extra units unless the label says to. More product does not mean safer or faster parasite control. With birds, overexposure is a real risk.
If your bird starts panting, tail-bobbing, sitting fluffed up, or acting weak, remove the product. Move the cage to fresh air without chilling the bird. Then contact an avian vet.
Safety Warnings, Risk Factors, and Mistakes to Avoid
The biggest safety risk is using the product like a treatment you apply to the bird. Don’t do that. Cage protectors belong in the cage setup, not on feathers, skin, eyes, nostrils, or feet.
Birds have highly efficient respiratory systems. That helps them fly, but it also makes airborne irritants more dangerous. The American Association of Avian Veterinarians is a useful place to find bird-specific veterinary care.
Avoid these common mistakes:
- Hanging it where the bird can bite it
- Placing it over food or water
- Using it in a tiny, poorly ventilated cage
- Combining it with sprays, powders, or foggers
- Leaving it in after the label’s replacement period
- Using dog or cat flea products on birds
- Treating a sick bird without veterinary advice
Be extra cautious with finches, canaries, budgies, and other small birds. Their body size makes exposure errors less forgiving. Cockatiels and larger pet birds still need careful placement and clean air.
A clean cage also matters. If mites are hiding in cracks, nests, rope toys, or dirty perches, one cage protector may not solve the problem. Outdoor feeding stations can attract wild birds and parasites, so keep indoor bird supplies away from outside feeding spots.
Skip essential oils, household insect sprays, and dusty powders around birds. “Natural” does not mean bird-safe. A strong-smelling oil or fine dust can irritate a bird’s airway fast.
If you want to support wild birds while protecting your pet bird, separate the two spaces. Good outdoor practices, including bird-friendly planting, should never involve shared bowls, cages, perches, or cleaning brushes.
What to Do If Your Bird Still Has Mites, Lice, Scratching, or Feather Loss
If symptoms continue, don’t keep adding products. Remove obvious irritants, clean the cage again, and get an avian vet opinion.
Persistent scratching can mean the parasite problem is still active. It can also mean something else is going on. Molting, dry air, poor nutrition, bacterial skin disease, fungal issues, feather picking, and stress can all look similar at first.
Use this simple guide:
| What you see | What to do next |
|---|---|
| Mild scratching, normal behavior | Clean cage and monitor closely |
| Visible mites or lice | Call an avian vet for treatment advice |
| Feather loss with broken skin | Book veterinary care promptly |
| Tail-bobbing, wheezing, weakness | Seek urgent avian care |
| Crusty face, beak, or legs | Ask about scaly mite treatment |
| Restlessness mainly at night | Inspect cage cracks and perches |
Don’t use cat or dog flea products on birds. Don’t use household bug spray near the cage either. These products can be dangerous for pet birds, even in small amounts.
If wild birds visit your property, keep outdoor supplies away from pet bird gear. Food bowls, brushes, and storage tubs should never cross over. Healthy garden feeding routines are great outdoors, but indoor cage hygiene needs stricter separation.
Cleaning, Replacement, and Long-Term Cage Prevention
A cage protector works best as part of a clean-cage routine. It shouldn’t be asked to do the job of washing, drying, and replacing contaminated items.
Image source: Web (Bing) / walmart.com (Web image (fair-use with source credit))
Start with the cage tray, grate, bars, bowls, perches, swings, and toys. Wash what can be washed. Replace anything porous that looks heavily soiled or infested, especially nests, rope toys, and soft bedding.
Follow the replacement timing on the package. Don’t leave an old protector in the cage because it “might still be working.” Once the label period has passed, dispose of it as directed and wash your hands.
A practical prevention rhythm looks like this:
- Daily: remove wet food, droppings, and dirty liner.
- Weekly: wash bowls, perches, tray, and cage surfaces.
- After suspected mites: deep clean cage cracks, joints, toys, and nearby stands.
- Before adding a new bird: quarantine and inspect with vet guidance.
If your home attracts outdoor birds, don’t place your pet bird cage beside open feeding areas. Good yard habitat choices can stay outside. Your indoor bird still needs clean airflow, clean tools, and parasite control based on its own cage conditions.
FAQs About 8 in 1 Bird Protector Instructions
Do I put 8 in 1 Bird Protector directly on my bird?
No, don’t put it directly on your bird. It’s designed for cage placement, not skin or feather application. Keep it away from the eyes, nostrils, beak, feet, food, and water.
If the product touches your bird or gets chewed, remove it and call an avian vet for advice.
Where should I hang it in the cage?
Hang it where the label says and where your bird cannot chew it. Choose a ventilated area away from food bowls, water dishes, bathing areas, and favorite perches. If your bird can reach it with its beak, move it.
Direct chewing or ingestion is a safety concern.
Can I use more than one protector for a bad mite problem?
Use only the number listed on the package. More product can increase exposure and may irritate your bird. Heavy infestations need cleaning and veterinary guidance, not guesswork.
If you can see parasites or your bird is losing feathers, ask an avian vet what treatment is safe.
How long does 8 in 1 Bird Protector last?
The replacement period depends on the exact package directions. Check the label for the stated timeline, then mark the date you installed it. Don’t keep using it beyond that period.
Old products may lose effectiveness, and expired or damaged packaging can make directions unreliable.
What signs mean I should remove it right away?
Remove it if your bird pants, wheezes, tail-bobs, fluffs up, becomes weak, stops eating, or acts unusually distressed. Move the cage into fresh air without chilling the bird. Then contact an avian vet.
Fast action matters because birds can decline quickly when breathing is affected.
